One of the most common Halloween activities many families like to do together is Pumpkin Carving. They go to the pumpkin patch, pick out the biggest ones they can find, take them home and carve Jack-o-lanterns. It really is a fun event, and the pumpkin patches love it too because most of them charge by weight or size. But when your kids are too small to properly carve a pumpkin, and you don’t like squash guts anyway, what are you to do? We do Pumpkin Painting instead.
Each year, we make a trip to the pumpkin patch. I look for one that has lots of activities included in the price of admission, and specific sections for younger kids. A petting zoo is always a big bonus, and if it has a bounce place, it’s a definite win. We spend most of the day there, and towards the end, we go out to pick a pumpkin. But the pumpkin we pick, probably won’t be the one we paint. This one is for my child to proudly parade around and show everyone. I’ll buy painting pumpkins later from the grocery store where they are much cheaper. The day at the pumpkin patch is definitely a seasonal experience for us. The focal point is to have a fun day. It also signals that its fall, and time for pumpkin season.
After we get home, probably the next day, we get out our paints and our painting pumpkin. If you live further south where it stays warm through the fall, you could keep your kid in just a diaper (or underwear if potty trained) and then give them a bath afterward to wash any paint off. I’d also only do this if you have a fenced in yard nobody can peep into. If you do not, you just don’t want your child outside in their underpants, or it’s already cold and snowing before Halloween where you live, my best suggestion is an apron. Paint is still destined to end up on your kids clothing though, so be 100% sure you got washable paint. Put them in worn out clothes you’re not worried about piant getting on.

I take my kids outside to paint, so the mess is not on my flooring. We had a few younger kids join us this year including my younger child, so I got some baby sized pumpkins for them. I aso let my kids use real paintbrushes instead of those flimsy plastic ones kids paint comes with.
This activity probably won’t last long. The older kids may be more intent on their painting, but even so, a pumpkin is only so big. As they get older it may become a longer activity when they start expressing creativity more. Right now it lasts 20-30 minutes at most, much less for younger children.
I still threw my kids clothes right into the washer afterwards and gave them baths because of course they still managed to get everything messy.

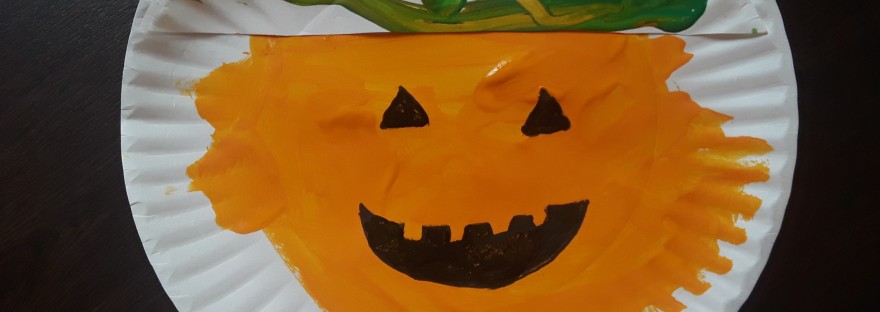
As you can see, kids are messy painters. They like to mix colors and experiment. But they are learning to be creative, as well as some hand eye coordination and dexterity. They are also usually very proud of their work, and feel accomplished.
If you want to do a family activity, but on a tight budget, this is also a good alternative. Like I said, the pumpkins we paint we get from the grocery store, off brand childrens paint, and a brush. Your cost will depend on how many pumpkins you need and how large. Those mini pumpkins came 6 in a bag for $3, making this craft less than $10. If you do want a pumpkin patch experience, look for one with a front gate admission. These usually include lots of things in the price. Patchs that are free admission will probably charge for each activity and spending a dollar here, 3 dollars there, accumulates cost very quickly. You get more for your money when the patch has a admission cost, and many have some kind of deal for purchasing tickets online.
So if you are looking for an alternative to pumping carving, look no further! Pumpkin painting is where its at!


 Starting pieces. I got a metal wreath ring, three rolls of tool, a string of garland, a little witch hat, a BOO, and two packages of small figures. Totaled to $9, and if you add tax round that up to $10. I did also use a hot glue gun and string that I already had and didn’t calculate into the price. Neither are terribly expensive if you need to buy them. If you do, add another $8-$10 dollars.
 First, I wrapped the orange tool around the metal ring flatly, and then with the second roll, I wrapped the orange but twisted it. Then added the purple tool on top of the orange. I decided to keep it only two colors to avoid making the wreath too busy and confusing to the eye. Simple is sometimes best, especially when it comes to base colors. I secured the tool directly to the metal ring and added a little hot glue for extra strength because tool likes to come apart.
 Next I added the ghost Garland. This added a third color to the mix and some spooky as well. I also secured this directly to the metal ring. Pretty simple step, just wrap the garland around the wreath.
 For the BOO I tied it onto the wreath with string to hold it on. Then I used the hot glue gun to position it where I wanted. I knew simply glue wouldn’t be strong enough to last, which is why I chose to tie it on with string for added strength.
 After I had the BOO where I wanted it, I arranged the small figures around it for added flair. I had a package of plastic bugs and skeletons and a package of glittery bats. I didnt use all the bugs, mostly just the spiders, so my kids got the extras to play with. I tried to positon them in places with contrasting colors so they would be easy to see. Hot glue is what I used to keep them in place. Careful with this part as not to burn your fingers on the hot glue that eeks through the loose weave of the tool.
 Lastly, I added the little witch hat in the middle of the wreath. I debated putting it on top or figuring a way to tie it on the front, but ultimately chose to put it in the middle. This was the most difficult part of the entire craft. I tied both sides down with string. I made little peeky holes down to the metal ring and secured the hat directly to it. Once it was tied down, I used a little hot glue to position it exactly how it needed to sit and keep it there.
 Final product on the door. In total, this took me about an hour to make and cost me just under $10. I like how it turned out, and I’m pretty pleased with my craftiness. I’m thinking next time though, I’m going to use black tool on the base and orange or purple garland. Just to make it more stable and simply pleasing to the eye. Final consensus is you can make a good looking wreath entirely of Dollar Tree materials. Have a fashionable door and not spend a fortune. I’d say the experiment was a success.